
I’m not sure that anyone who is just getting started in astrophotography understands how much stuff there is to figure out. And I doubt anybody started off by thinking to themselves, “Boy, this hobby is going to generate a ton of data–how am I going to keep track of it all?” Of course, there’s plenty of ways to try to organize your data, and newbies will probably try a half dozen different ways before settling on something that works for them. I know I certainly did.
I’ve been at this now for about five years, and I’ve shot about 66 targets, some of them more than once. My offline storage for astrophotography data currently takes up 1.8 TB and includes 83,000 files in 2,800 folders. This includes all the light frames and calibration frames (darks, flats, etc.) I’ve shot for each target. It also includes the master lights, PixInsight project files, Affinity Photo project files (Affinity is like Photoshop, if you’re not familiar), and finished images. I don’t keep the various intermediate products like the calibrated and registered frames that PixInsight generates in the process of creating the master light frames. I also don’t keep the master calibration frames–only the master light frames. So I throw away a lot of files and still end up with a ton of data.
As I said above, there are a lot of ways to organize this data, and I don’t claim to have the best answer, but I have something that works for me. It accomplishes two goals. First, it makes it fairly easy to find stuff. Second, the organizational structure makes it very easy to import my raw data into PixInsight’s Weighted Batch Preprocessing (WBPP) script for preprocessing. It takes me just a minute or two to load the lights, darks, and flats into WBPP and get it running, even if I shot the target over multiple nights and have separate flats for each night.
Before we go further, it’s worth noting that I use N.I.N.A. for managing my imaging runs, and N.I.N.A. gives me the flexibility of storing the various light frames and calibration frames in whatever organizational structure I like (more on that further below). Further, N.I.N.A. puts enough metadata in each file so that PixInsight can automatically figure out what type of frame is contained in that file. So when I set up WBPP to preprocess, I can just tell it to load all the files in a certain directory, and it’ll sort out the different types of frames and organize them correctly.
Top Level Organization
I use Windows 11 on all my computers, so this will be a Windows-centric description. My top level folder that contains all my data is named “Astrophotography” and is located in my Pictures folder (C:\users\Dave\Pictures). Within that folder is a folder for each target I’ve shot. Even if I shoot a target multiple times, there is only one folder for that target.
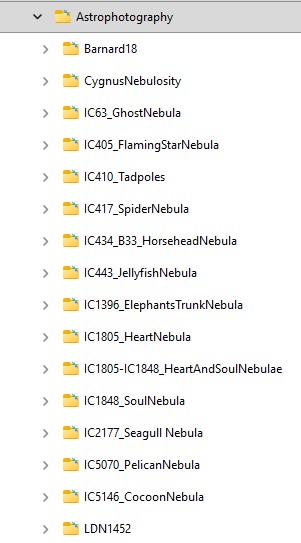
Within each target folder is a folder for each date that I shot the target. If I shot the target over multiple nights in order to get a single image, I group those nights under the date of the first night and count it as one shooting.
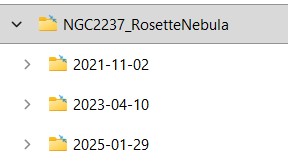
Each of the dates under the target folder represents an imaging effort comprised of one or more nights of data collection that will result in the creation of a single image. I format all my dates as YYYY-MM-DD because they naturally arrange themselves in date-ascending order when sorted alphanumerically.
In the folder for each date are three subfolders that organize the raw and processed data for the imaging effort:
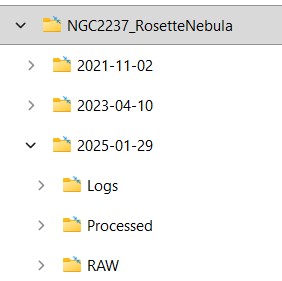
The “Logs” folder contains the (you guessed it) log files for each night of imaging from N.I.N.A., PHD2, and other software I used for data capture. The “RAW” folder contains all the light, flat, and dark flat frames captured. (I have a dark library for each camera stored separately and will use those for processing the image rather than capturing separate darks each time I take light frames.) The “Processed” folder is where I store the data and final result associated with my processing the raw data using PixInsight. Sometimes I also have a fourth folder here named “Rejected” where I move any subs that I reject when I inspect the subs prior to processing.
Raw Data Organization
Let’s talk about the “RAW” folder first. There are yet more date-associated folders under “RAW”, as well as a “Darks” folder. The “Darks” folder is actually dark flat frames associated with the flat frames taken for each night of imaging. The date-associated folders hold the light frames and flat frames taken during that night of imaging. I usually take sky flats at about sunrise after a night of capturing light frames, and I take flat frames for every night I shoot. I take the dark flats at the same time but these don’t really need to be grouped by date–PixInsight will associate them with the correct flat frames based on their exposure times (I use N.I.N.A.’s Flat Wizard in Dynamic Exposure mode, so the exposure times are rarely the same from one night to the next).
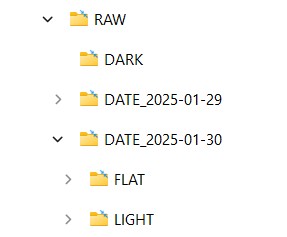
Note the “DATE_YYYY-MM-DD” format for the date folder names. I’ve set up PixInsight’s WBPP script such that it will group the lights and flats in each folder whose name is prefixed with “DATE_” and calibrate them separately. This ensures that the lights for an evening of shooting are calibrated using the flat frames captured the following morning. This way, each night’s data is calibrated separately before integrating them all together.
Finally, within the “LIGHT” and “FLAT” folders, the actual light and flat frames are grouped into folders by filter name:
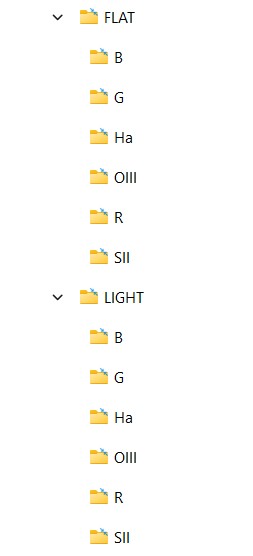
I group the frames by filter solely for my own convenience. PixInsight doesn’t really care about this and you could alternatively store all the light frames for the evening in a single folder (same for the flat frames).
The obvious next question is how do I get N.I.N.A. to create and populate this folder structure? N.I.N.A. allows a high degree of customization regarding how you raw data is stored on disk. These settings are found in N.I.N.A. under Options -> Imaging:
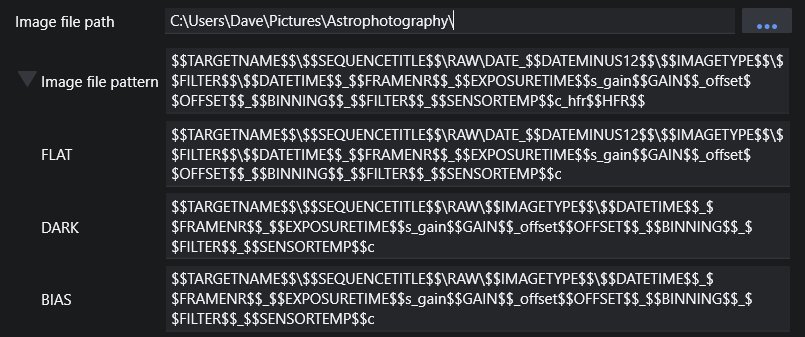
The first setting, Image file path, sets the root folder for storing you raw data. Each of the following settings determines not only how each type of file (image, flat, dark, and bias) will be named, but also the folder under the root in which it will be stored. Here they are in text form so you can cut and paste if you wish:
Image file pattern: $$TARGETNAME$$\$$SEQUENCETITLE$$\RAW\DATE_$$DATEMINUS12$$\$$IMAGETYPE$$\$$FILTER$$\$$DATETIME$$_$$FRAMENR$$_$$EXPOSURETIME$$s_gain$$GAIN$$_offset$$OFFSET$$_$$BINNING$$_$$FILTER$$_$$SENSORTEMP$$c_hfr$$HFR$$
FLAT: $$TARGETNAME$$\$$SEQUENCETITLE$$\RAW\DATE_$$DATEMINUS12$$\$$IMAGETYPE$$\$$FILTER$$\$$DATETIME$$_$$FRAMENR$$_$$EXPOSURETIME$$s_gain$$GAIN$$_offset$$OFFSET$$_$$BINNING$$_$$FILTER$$_$$SENSORTEMP$$c
DARK: $$TARGETNAME$$\$$SEQUENCETITLE$$\RAW\$$IMAGETYPE$$\$$DATETIME$$_$$FRAMENR$$_$$EXPOSURETIME$$s_gain$$GAIN$$_offset$$OFFSET$$_$$BINNING$$_$$FILTER$$_$$SENSORTEMP$$c
BIAS: $$TARGETNAME$$\$$SEQUENCETITLE$$\RAW\$$IMAGETYPE$$\$$DATETIME$$_$$FRAMENR$$_$$EXPOSURETIME$$s_gain$$GAIN$$_offset$$OFFSET$$_$$BINNING$$_$$FILTER$$_$$SENSORTEMP$$c
The names delimited by $$ on either side are placeholder variables whose actual values are taken from information within your N.I.N.A. imaging sequence. $$SEQUENCETITLE$$ is by default the name of the sequence file and is located at the top of the sequence definition (2025-01-29 in the example below):
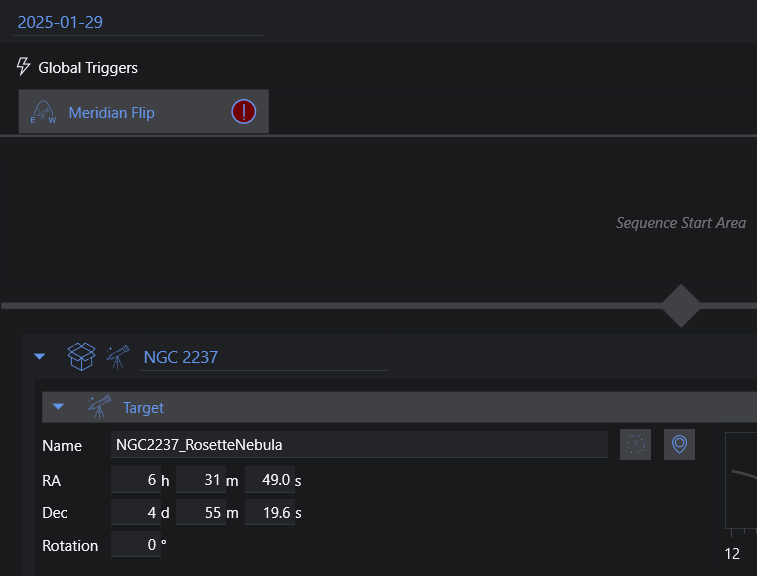
and N.I.N.A. will set the sequence title whenever you save the sequence file, so you may have to change it after saving the sequence file. I name my sequence files beginning with the date in YYYY-MM-DD format, followed by the target name and any other info I find useful. After I save the file, I modify the sequence title by removing everything after the YYYY-MM-DD but I don’t resave it. You could just use the sequence title as is if desired–anything that tells you when you shot. If I shoot the same target over multiple nights, I use the same sequence title for each night.
$$TARGETNAME$$ is simply the name of the target (NGC2237_RosetteNebula in the example above).
For light and flat frames, to differentiate each night’s subs, I had a subfolder titled DATE_YYYY-MM-DD by including the following in the N.I.N.A. folder definition: DATE_$$DATEMINUS12$$. $$DATEMINUS12 is the date on which the sub was taken, minus 12 hours. Since my subs for a given day are all taken between noon on that day and noon on the next, this means that subs taken after midnight will be grouped in the same folder as those taken before midnight.
The other variables in the filename definitions are more or less self-explanatory, and result in filenames for each type of image like these examples:
Image file pattern: NGC2237_RosetteNebula\2025-01-29\RAW\DATE_2025-01-29\LIGHT\L\2025-01-29_12-00-00_0001_180s_gain100_offset20_1x1_L_-10c_hfr3.25
FLAT: NGC2237_RosetteNebula\2025-01-29\RAW\DATE_2025-01-29\FLAT\L\2025-01-29_12-00-00_0001_10.21s_gain100_offset20_1x1_L_-10c
DARK: NGC2237_RosetteNebula\2025-01-29\RAW\DARK\2025-01-29_12-00-00_0001_10.21s_gain100_offset20_1x1_L_-10c
BIAS: NGC2237_RosetteNebula\2025-01-29\RAW\BIAS\2025-01-29_12-00-00_0001_0.0005s_gain100_offset20_1x1_L_-10c
A note about dark, flat and bias frames: I never shoot dark, flat, or bias frames as part of my imaging sequence. I created separate dark and bias libraries and I reuse those as needed when stacking and preprocessing in PixInsight. For flat and dark flat frames, I shoot those using N.I.N.A.’s Flat Wizard, which makes use of the file/folder name definition above except for the sequence title. Additionally, you set the target name in the Flat Wizard. Once the flats and dark flats are taken, you’ll need to manually move the resulting folders into your overall folder structure.
Processed Data Organization
Let’s move back up the folder structure now and take a look at the “Processed” folder (at the same level as the “RAW” folder). I think most of us would say that we sometimes process the same target more than once. Perhaps I learned a new processing technique and want to try it out, or maybe I’m just not as happy as I could be with an image I processed and want to try again. So under my “Processed” folder is a date-associated folder for each time I processed this data.
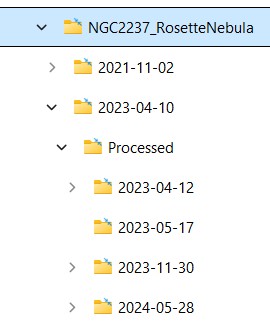
I use the Weighted Batch Preprocessing (WBPP) script in PixInsight, and I specify the date-associated folder as the output folder for the script. PixInsight will then place the subfolders for master frames as well as all the intermediate frames under this folder, and I’ll store PI project files and final saved images there as well.
Loading the Files into PixInsight’s WBPP Script
Everything I described above was designed to make it easy to load all the raw data into the WBPP script in PixInsight for calibration and stacking. First, I need to specify “DATE” as a grouping keyword, so that lights taken on the same date are calibrated with the flats taken on the same date (hence the “DATE_YYYY-MM-DD” folder within the folder structure in the RAW folder, as described above).
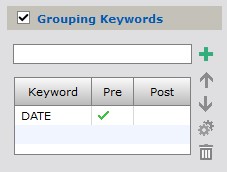
Then in WBPP on the Calibration tab I can simply hit the “+Directory” button and specify the RAW folder containing all the lights, flats, and darks for all the nights for which I imaged the target–in this example, Continuing with the example, C:\users\Dave\Pictures\Astrophotography\NGC2237_RosetteNebula\2025-01-29\RAW. This will load all the lights, flats, and dark flats I took for this target. The next step is to load the master darks corresponding to the exposure times I used for the light frames, using the “+Files” button. Finally, I need to specify the output folder, where all the masters as intermediate frames created by WBPP will be stored. In this example I’ll create a “2026-07-27” folder under the Processed folder for this target:
C:\users\Dave\Pictures\Astrophotography\NGC2237_RosetteNebula\2025-01-29\Processed\2026-07-27
If there are any other WBPP settings I want to change, I make those changes now, and then I hit the “Run” button. WPBB will do its thing, and all the outputs will be in the folder I specified.
In conclusion, there’s quite a bit of setup involved, but it only needs to be done once. The settings I’ve described above really streamline the process of running WBPP to calibrate and stack the raw data I’ve taken for a target, possibly over several evenings. You might want to do things differently but the options that N.I.N.A. gives you make almost any configuration possible.