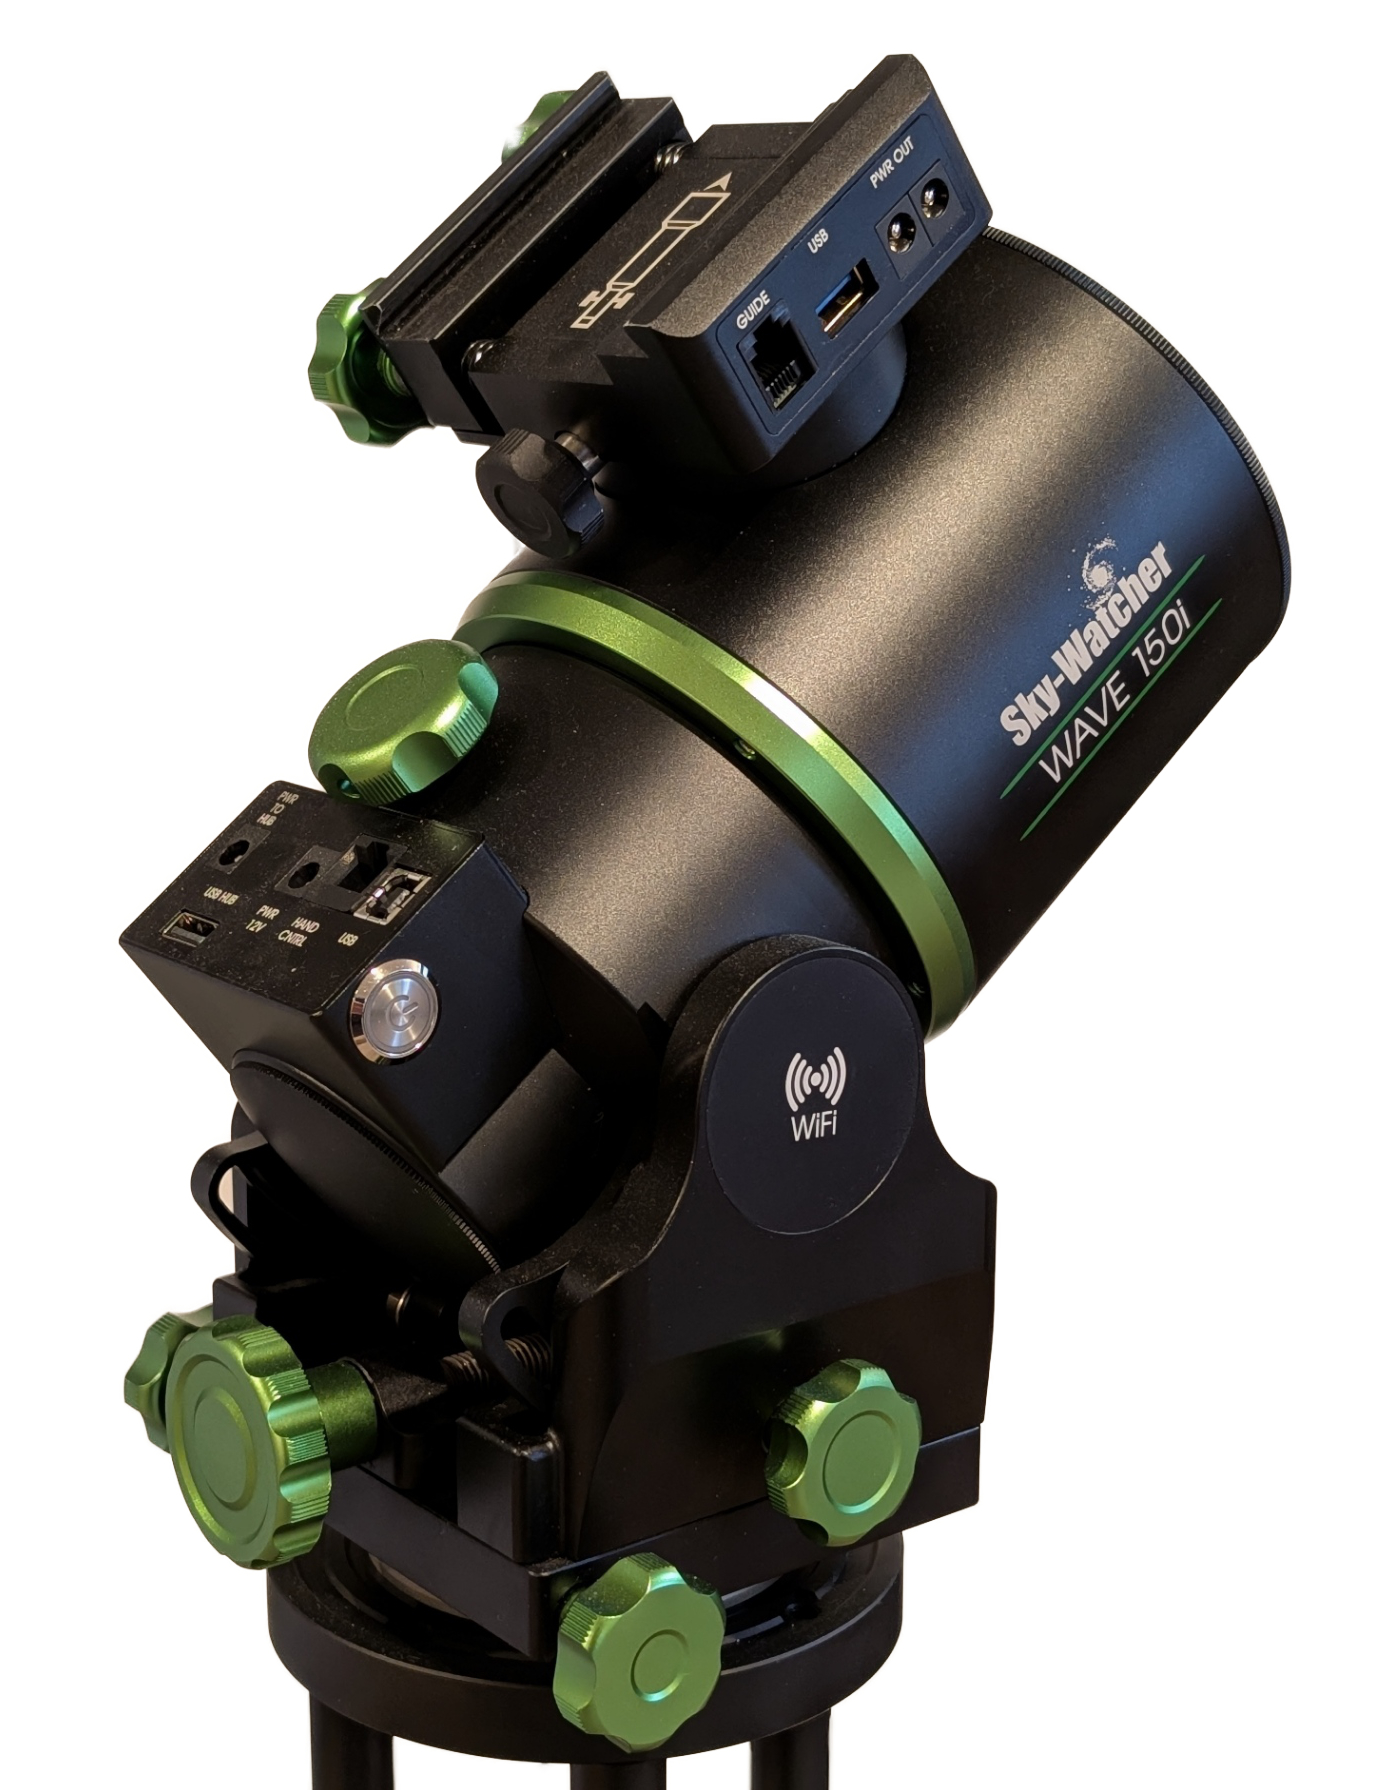

The Sky-Watcher Wave 150i strain wave mount has become my go-to mount (pun intended) for portable imaging. It’s a lightweight mount in a small package, but it handles a reasonable payload without the need for counterweights. It also sports some features you don’t find in every mount, especially those geared toward portability. This mount could easily replace my iOptron GEM45 as my main mount if needed. In this article I’m going to talk about why I chose the Wave 150i and some things you might want to know before buying one for yourself.
For me, portability means being able to easily throw my gear in the back end of my SUV or in the cargo bay of my RV. I’m a retired old guy, too, so it also means not having to lift equipment that’s too heavy. So while I might be able to transport a larger and heavier mount, I’d rather avoid that. The Wave 150i weighs only 12.8 lbs, and its carrying case adds only a pound or two to that weight. It’s surprisingly compact, as well–the carrying case is only 11″ x 13.5″ x 8″. Yet its advertised payload limit without using a counterweight is 33 lbs. My portable imaging scope is an 80-mm f/5 refractor, and even with the camera, filter wheel, mini PC, and power box its total weight is only around 17 lbs or so–ideal for the Wave 150i.
What really made the Wave 150i stand out for me over other strain wave mounts was its cable management features–specifically, USB and power ports mounted on the saddle that eliminate the need for cables to be hanging off the imaging train. This and other features made the Wave 150i the winner when I compared it to strain wave mounts available from iOptron, ZWO, and others.
Mount Connections
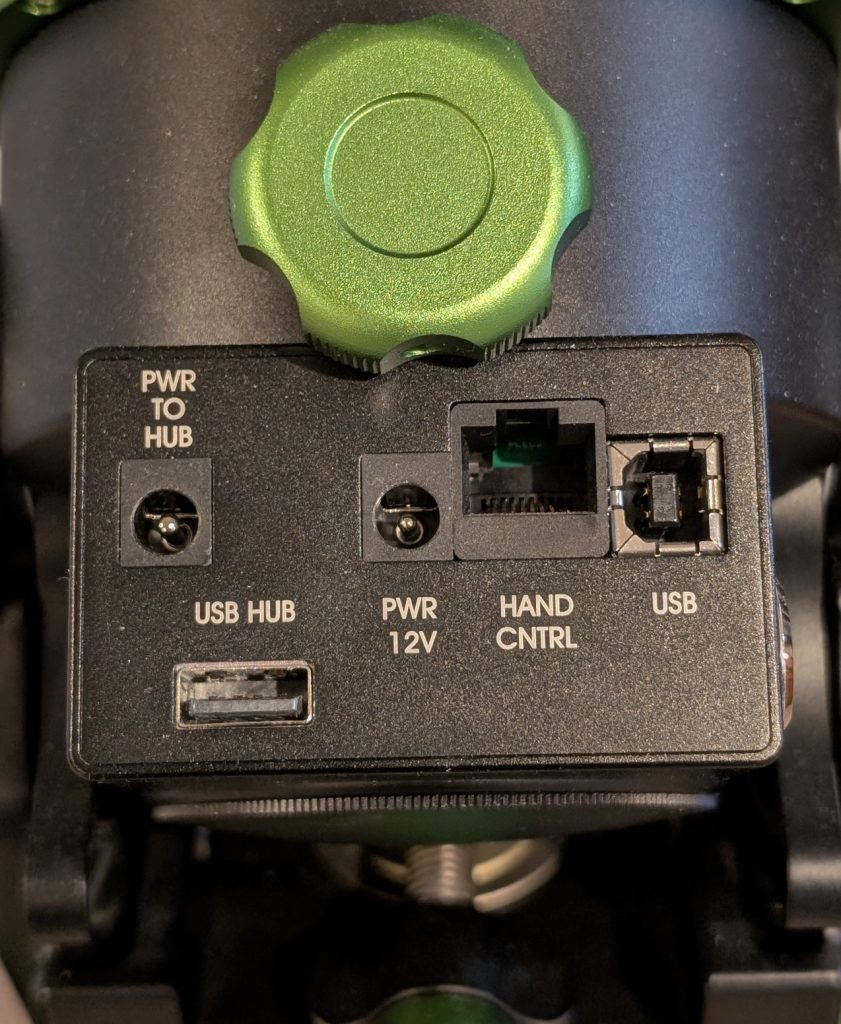
The mount head sports five power and data connections. First and foremost are PWR 12V and USB, which power the mount and provide a USB connection for controlling the mount from a computer. PWR 12V accepts a 5.5 x 2.1 mm barrel connector, pretty common for 12-volt power supplies.
Next, PWR TO HUB connects directly to the power jacks on the saddle, meaning you can connect a power supply to the PWR TO HUB jack to provide power to the power jacks on the saddle. The Wave 150i initially used the less-common 5.5 x 2.5 mm connectors for PWR TO HUB and the power jacks on the saddle, but at some point Sky-Watcher switched to 5.5 x 2.1 mm connectors all around (probably due to some negative feedback from users). As you can see from the image above, mine is one of the earlier mounts and uses a 5.5 x 2.5 mm connector.
USB HUB is similar–it’s basically one end of a USB cable that runs directly to the USB connection on the saddle. It’s worth noting that this USB pass through between the mount head and saddle supports USB3 (I verified this for myself).
Finally, the HAND CNTRL connection is for (you guessed it) a separate hand controller, which is not included with the Wave 150i and must be purchased separately if you want it. I have not purchased a hand controller because it’s fairly easy to control the mount using a smartphone running the Synscan Pro app and connected to the mount’s wifi. Most of the time I have the mount connected to a mini PC and use N.I.N.A. or the PC version of the Synscan Pro app to control it.
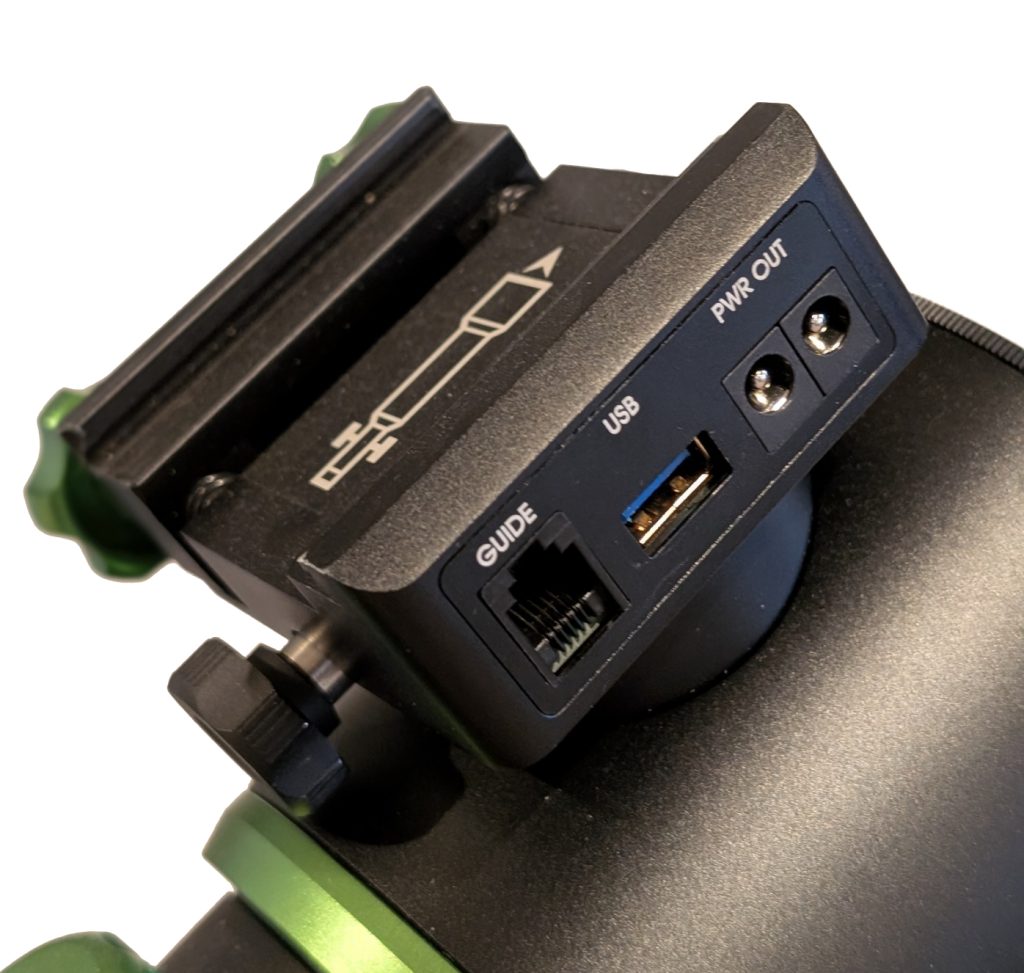
As already mentioned, the saddle has a USB port and two power ports. The saddle USB port connects directly to the USB HUB port on the mount head, and the PWR OUT connections connect directly to the PWR TO HUB connection on the mount head. The PWR OUT connections initially used 5.5 x 2.5 mm connectors, as previously mentioned, but later were switched to 5.5 x 2.1 mm connectors.
Cabling the Portable Imaging Rig
My portable imaging rig (the 80-mm refractor on the Wave 150i) uses a mini PC and power box, both mounted on the telescope itself. This further simplifies the cabling needed to connect everything. I use the power pass through to get 12 volts to the saddle and then to the power box to run everything. I use the USB pass through to connect the mount’s USB port to the mini PC. Here’s a cabling diagram that shows how everything is wired:
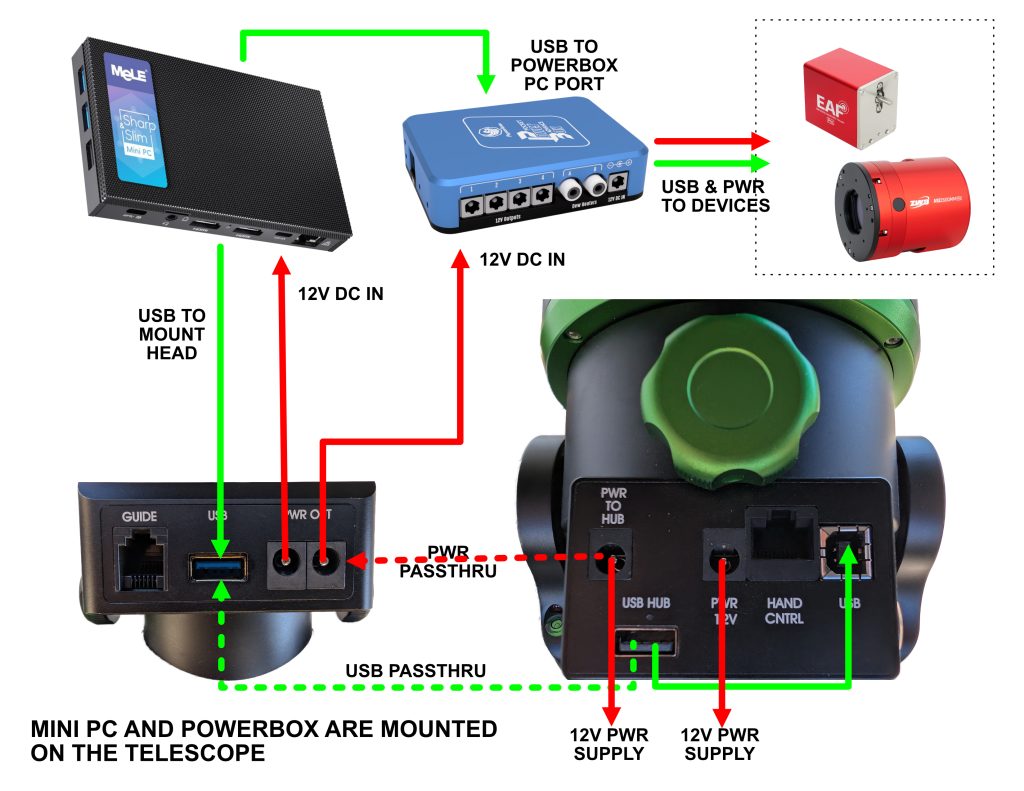
Note that the power pass through (PWR TO HUB to PWR OUT) is rated for a maximum current of 5 amps at 12 volts. If whatever you’re powering on the saddle requires more than 5 amps, you should run a power cable directly from your power supply to your equipment on the saddle rather than using the power pass through. In my case, my Pegasus Pocket Powerbox Advance tells me that the current draw from the saddle is much less than 5 amps.
Here’s what my mount head looks like when it’s cabled like the diagram above:
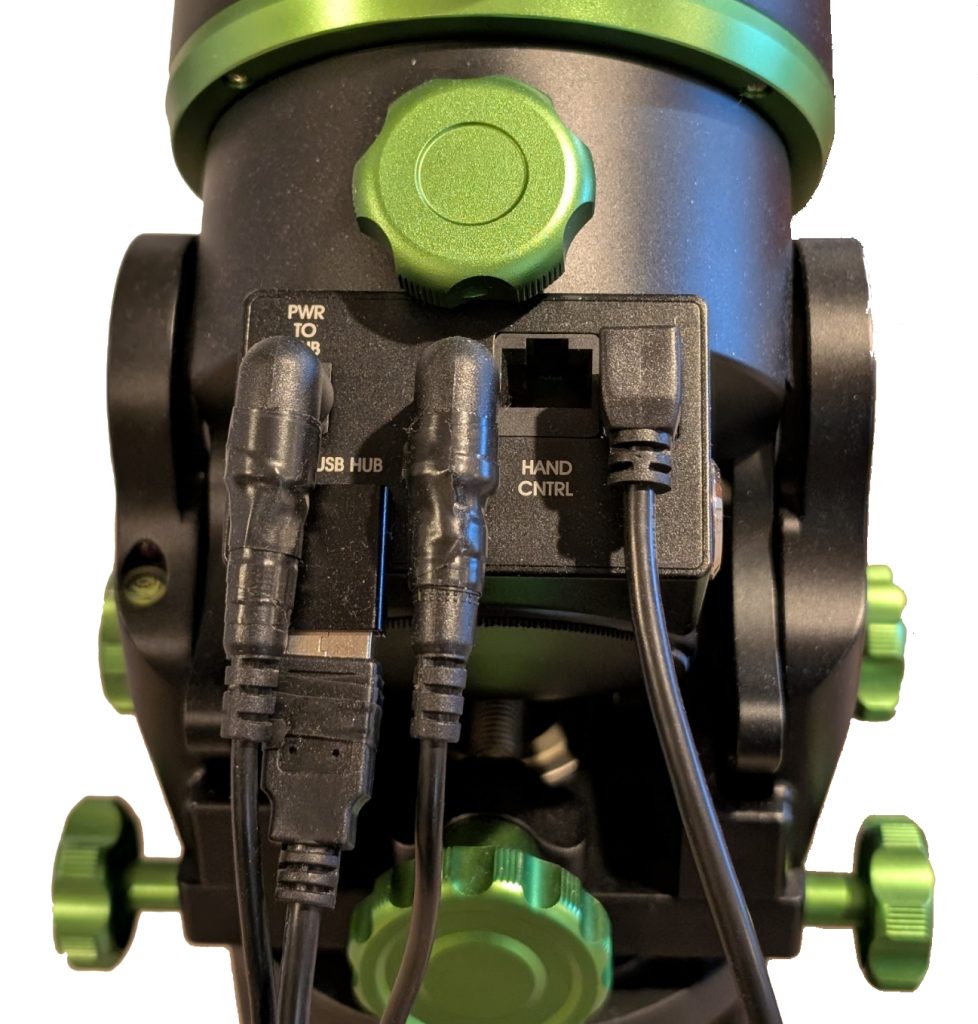
I use right-angle adapters to keep the cables from sticking up too high and potentially interfering with the movement of the telescope in declination. One of the right-angle power connectors is also an adapter that converts the 5.5 x 2.1 mm connector from the power supply to the 5.5 x 2.5 mm jack required by the PWR TO HUB connection. In my case, I’m feeding both the 12 volt power inputs with a single 12 volt 10 amp power supply with a Y cable.
The other connection at the mount head is a cable that runs from the USB connection to the USB HUB connection. This serves to connect the mini PC on the telescope to the mount via this USB pass through. I used a right-angle adapter at the USB HUB connection to keep the USB cable from sticking up too far. It’s worth noting that the mount uses USB2, not USB3. This is significant because none of the right-angle USB adapters like the one I’m using would support USB3, even though they were advertised as such.
Tripod and Mini Pier
The Wave 150i mounts on a tripod having a center 3/8″ x 16 threads/inch connecting screw. I already had a carbon fiber tripod that would work with the Wave 150i so I only purchased the tripod extension tube that Sky-Watcher sells for the Wave 150i. After a winter of using the carbon fiber tripod, however, I felt like the stability of the tripod was lacking. I had a spare steel tripod from my iOptron GEM45 sitting idle, but it didn’t have the necessary center connecting screw. Luckily, iOptron sells a mini pier (product code 8044) that would mate the iOptron tripod with the Wave 150i mount head. Unsurprisingly, the iOptron mini pier is designed to pair with many of iOptron’s tripods and mounts, but it will also attach to a tripod and/or a mount using the 3/8″ x 16 connecting screw. This made it simple to use my steel iOptron tripod with the Wave 150i.
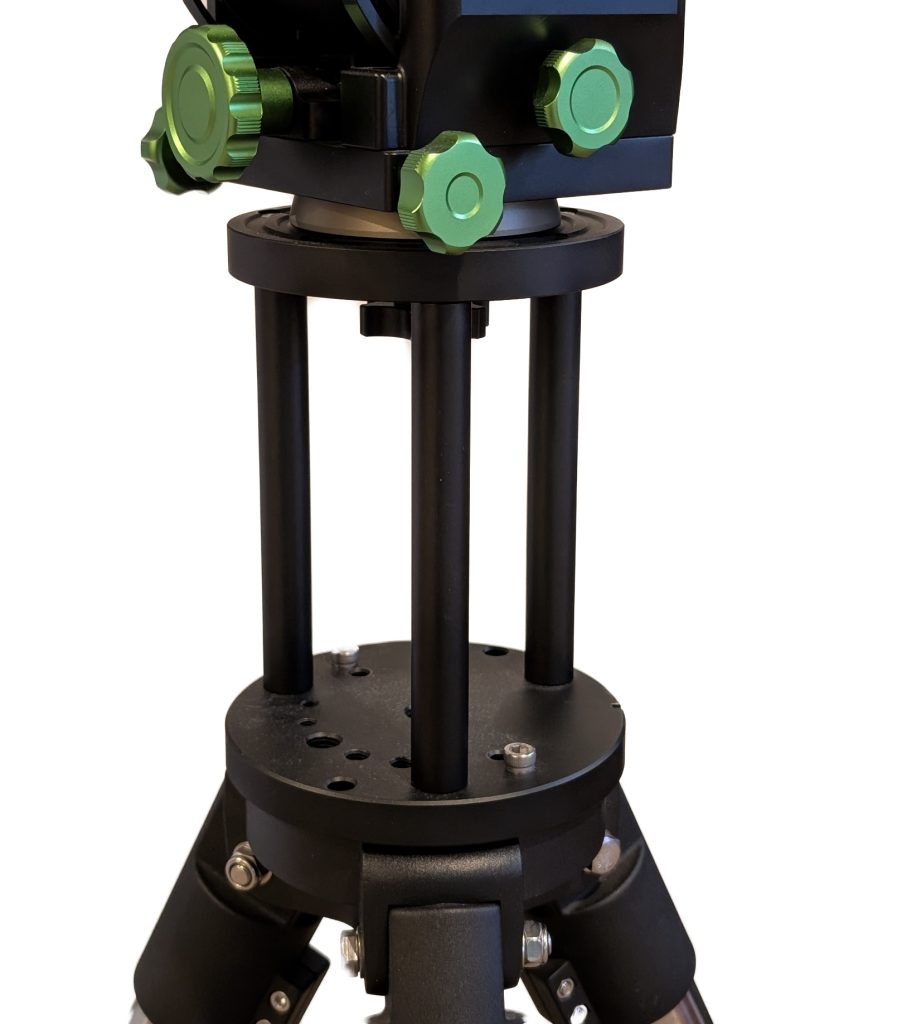
The iOptron mini pier has the same mounting scheme as the Sky-Watcher tripod extension tube (3/8″ x 16 threads/inch on both ends) and can completely replace it. Further, the Sky-Watcher tripod extension tube needs to be partially disassembled and reassembled to either connect it to the Wave 150i or disconnect it, because the tube is completely enclosed and prevents access to the knob that tightens the screw to the mount. On the other hand, the Sky-Watcher mini pier is open and allows access to that knob. For this reason alone, I recommend the iOptron mini pier over the Sky-Watcher tripod extension tube for use with the Wave 150i, especially as they are comparably priced. But be sure that iOptron’s mini pier will work with whatever tripod you plan to use.
Other Features
The Wave 150i has some other features that you may or may not find useful:
Wifi and Bluetooth connectivity: The Wave 150i broadcasts its own wifi signal, and you can easily connect to it with your PC, tablet, or smartphone to control the mount with Sky-Watcher’s Synscan Pro app or other apps like SkySafari. It’s also possible to configure the mount to connect to your own wifi network, but when I tried that out I found it to be finicky and difficult to configure. It would also revert its settings after a period of time. For what it’s worth, I don’t generally use the mount’s wifi capabilities because it’s normally connected to the mini PC controlling it using USB, and I connect to the mini PC using remote desktop. I have occasionally connected to the mount’s wifi with my phone so that my phone can act as a hand controller for testing purposes. I’ve tested the Bluetooth connection to confirm it works, but I don’t otherwise use it.
Auto Home: The Wave 150i is capable of automatically finding and saving its Home position (telescope on top, pointed at 90 degrees declination). Like most other mounts, the Wave 150i assumes that it is in the Home position when it is turned on. You can use the Auto Home function to correct any error in the power-up position. I usually use this function after I turn on the mount.
RA and Dec Locking Knobs: These knobs should really be called “unlocking” knobs. Their purpose is to allow you to temporarily disconnect the RA and Dec axes from their motors, allowing a modest range of motion (a few tens of degrees) for the purpose of balancing the payload on the mount. These knobs are not clutches–loosening them doesn’t allow unlimited rotation. I found these knobs to be not very useful. First, since I’m using a fairly light payload and don’t use a counterweight, there is no balancing of the RA axis to be done. On the declination axis, I found the locking knobs to be difficult to grab due to their locations, and the range of motion allowed by loosening the knobs was barely sufficient to allow balancing. Additionally, these knobs tended to work themselves loose after being hand-tightened, allowing some play in the declination axis. I ended up using a pliers to tighten them down and then leaving them alone. I found the balance point of my payload manually and made sure I centered that in the mount’s saddle. In short, I never use these knobs and have tightened them with a pliers so they don’t work themselves loose.
Azimuth and Altitude Fine Adjustment Knobs: These are a fairly common feature on modern telescope mounts, and the ones on the Wave 150i work acceptably for performing polar alignment. I had no trouble using SharpCap’s polar alignment tool for aligning my Wave 150i. The only complaint I have is that the azimuth knobs tended to be hard to turn, and the altitude knob had quite a bit of play/backlash. I was able to improve the azimuth knobs by removing them, cleaning them, greasing them, and reinstalling them. I compensate for the play in the altitude knob by always trying to approach polar alignment by increasing the altitude. It’s a minor gripe.
Other Notes
I use N.I.N.A. to control the Wave 150i during astrophotography sessions, and this requires installing an ASCOM driver as a go-between N.I.N.A. and the mount. There are two options here–Sky-Watcher’s SynScan Pro app and accompanying ASCOM driver, and a free third-party driver called Green Swamp Server. Either will work, but I prefer Green Swamp Server because it feels easier to use. One thing I learned about Green Swamp Server is that, if you use it with PHD2, you need to change a setting in PHD2 to enable “reverse DEC output on meridian flip.”
Additionally, the general recommendation when guiding with PHD2 is that you set the guiding exposure interval to be 1.5 seconds or less. Strain wave mounts in general seem to require more frequent corrections than conventional mounts. There is a wealth of information regarding settings for guiding with stain wave mounts on the web, and not all of it agrees.
Final Words
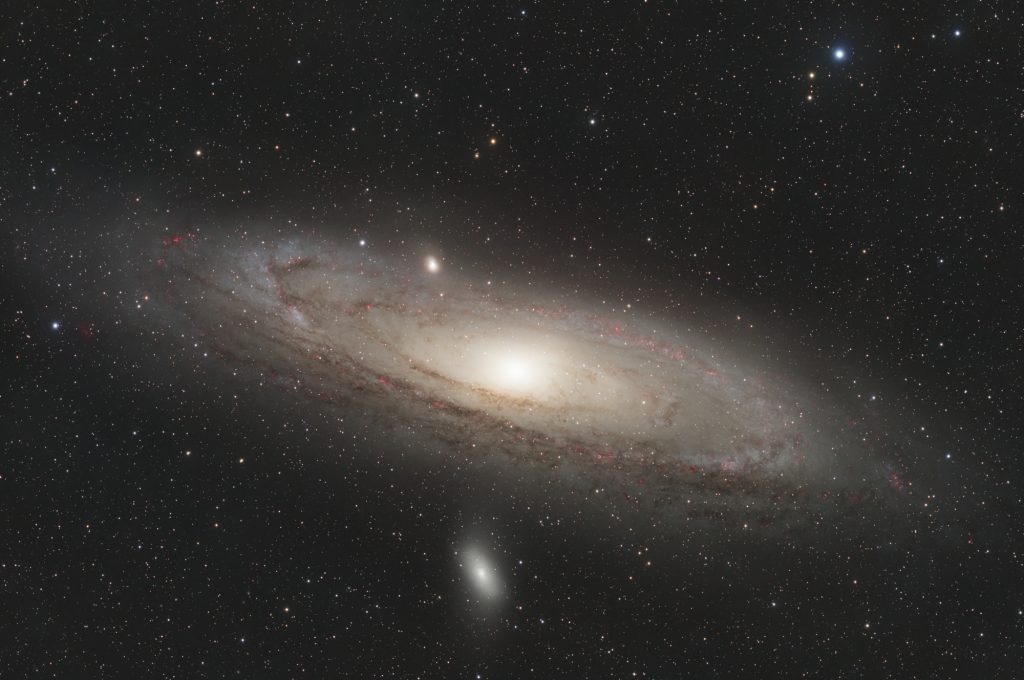
I’m extremely happy with how the Wave 150i performs, particularly for portable imaging. Here are a couple images I’ve taken with my 80-mm refractor riding on the Wave 150i. Every mount has its good and bad points like the Wave 150i, but the bottom line for me is that the Wave 150i lets me shoot and obtain good results.